Makers Lab
zines
prototypes
design files
code
idea scribbles
Moritz Steinbeck
documentation
week 02 - process mapping
week 01 - kick off
week 03 - reading week
week 04 - critical making 3D
week 05 - collecting & storytelling
week 06 - electronics & Open Design
week 08 - self-directed projects
week 07 - Interfaces & algorithmic bias
week 09 - Interfaces & algorithmic bias
week 10 - self-directed projects
Design Research Skills
Maker Skills and Attitude
Collaborative Learning
Introduction: What is your project about? Which fascination sparked it?
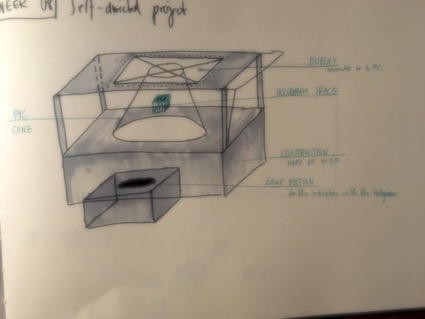
The project is all about Human-Machine-Interaction with a hologram.
I want to create a box (like in the picture on the right) that is able to display a hologram.
To achieve this kind of images i want to use the concept of a Pepper's Cone as shown in this video by Xuan Luo:
On top of the box i would like to assemble a display that creates the content for the hologram.
In order to interact with the hologram i want to use a Leap Motion Controller.
Goal of the project: what is the project meant to achieve? (awareness of something, a new or different perspective on a topic, a material exploration, a catalogue of techniques, a tutorial, a new evocative aesthetic experience, other)
My main goal of the project is that i want to research different ways to interact with 3D Objects just with your hands. No additional input device should be needed - just your hands.
I want to learn to discuss my ideas with a sparing partner.
Relevance: why is this project important to other people who might read about it? What might other people learn from your project and documentation?
The interaction patterns that i try to develop could be used in further research projects for example in the field of ergotherapy for hands to rebuild fine motor skills.
Context: which other projects are related to this idea? Where do you get inspiration from? (include at least 3 references with NAME, TITLE, YEAR of project and WEBLINKS if applicable.
PEPPER'S CONE: AN INEXPENSIVE DO-IT-YOURSELF 3D DISPLAY
Xuan Luo, Jason Lawrence, Steven M. Seitz
2017
https://roxanneluo.github.io/PeppersCone.html
Interaction Sprints at Leap Motion: Exploring the Hand-Object Boundary
MARTIN SCHUBERT & BARRETT FOX
2017
http://blog.leapmotion.com/interaction-sprint-exploring-the-hand-object-boundary/
Expected outcomes: what do you intend to deliver at the end of the project?
At the end of the project i want to have built the entire Box with a working simple Hologram, that could be controlled or modified with just your hands.
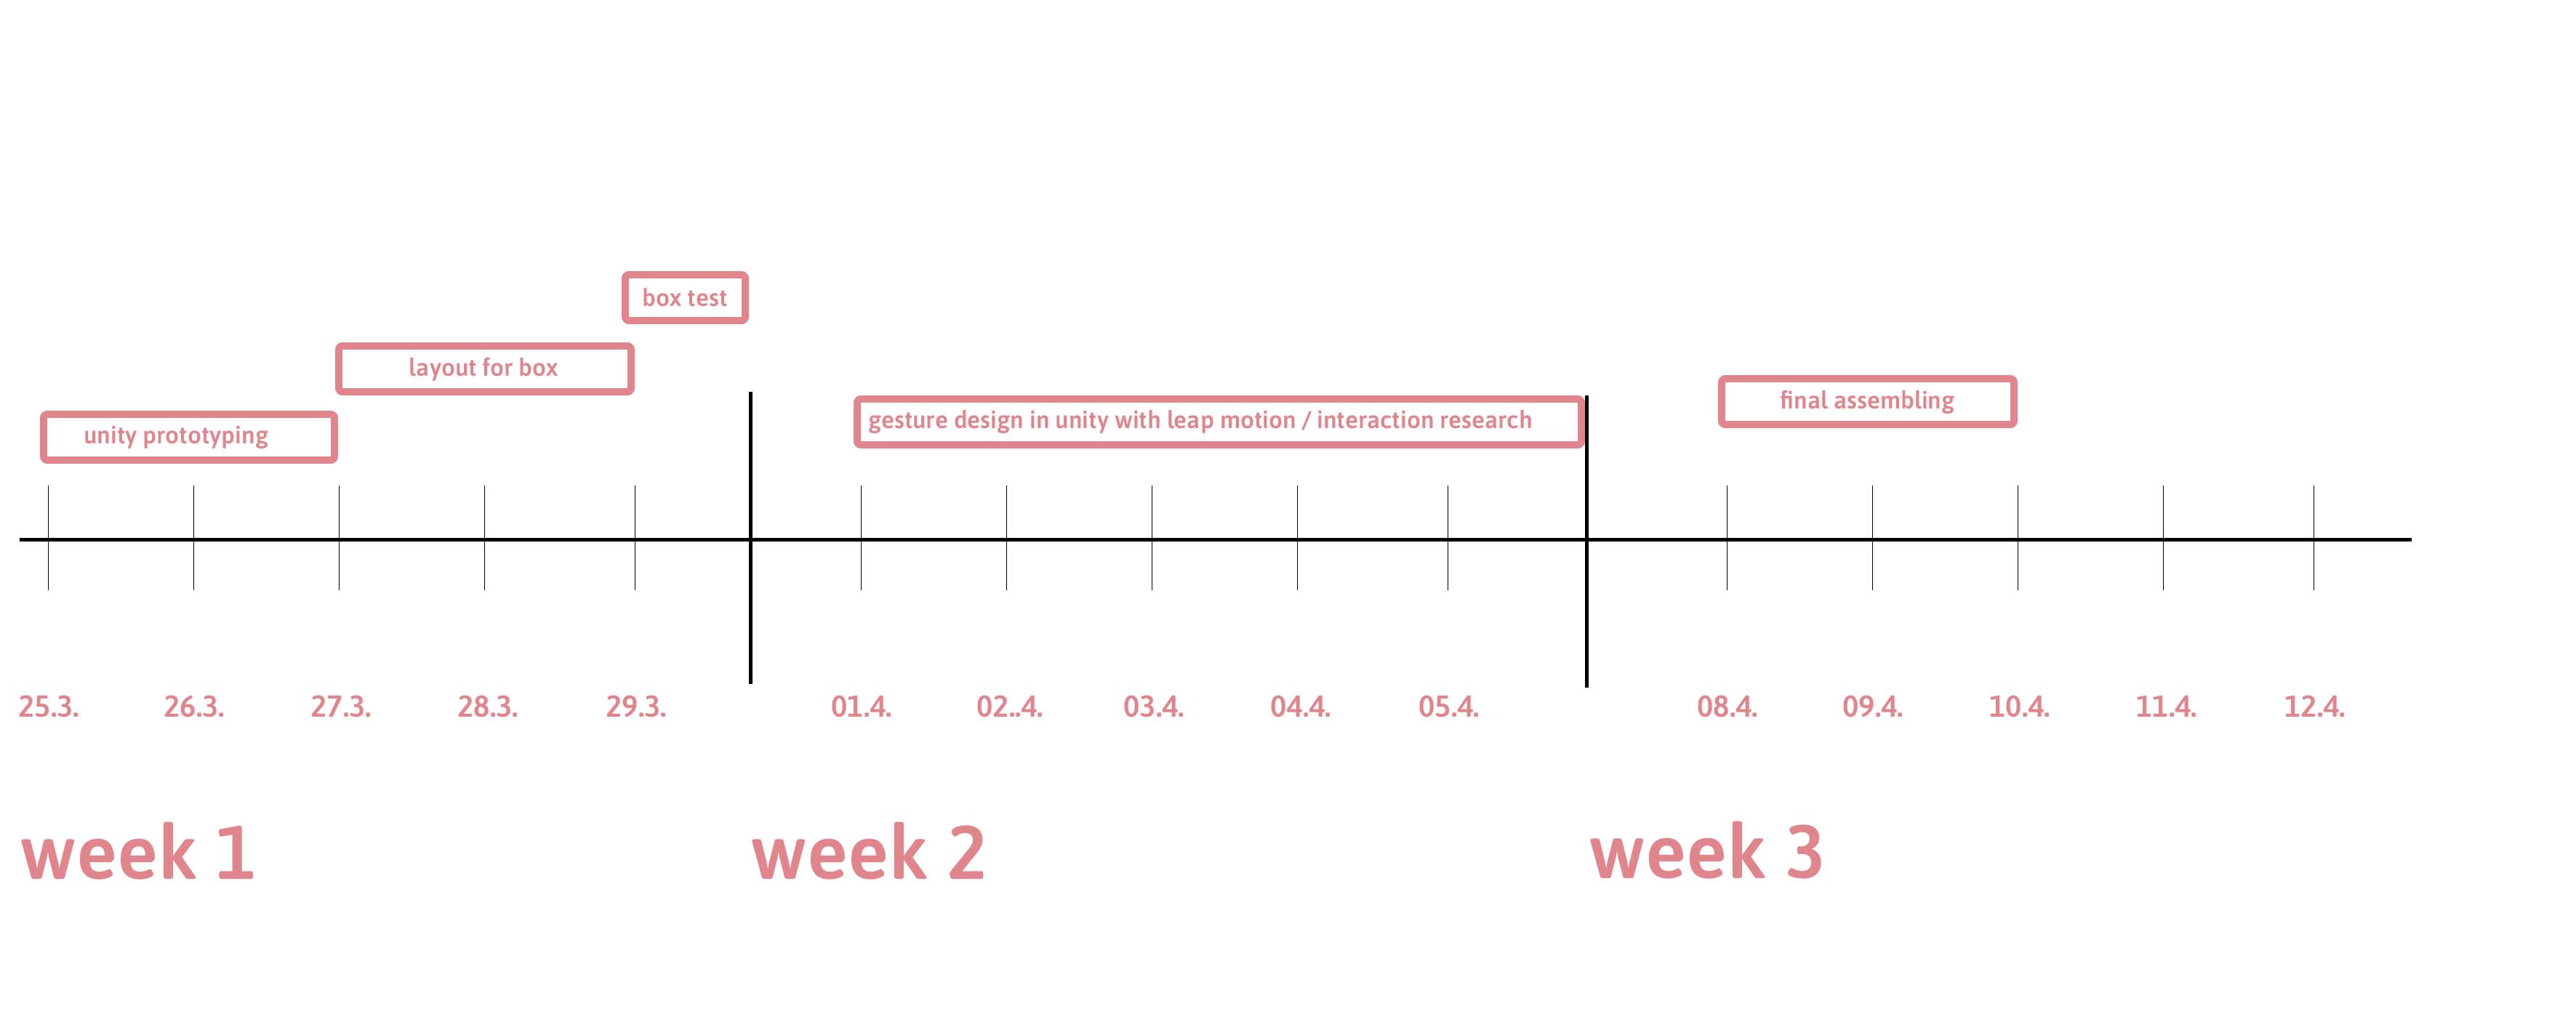
Activities and planning: list the activities you will undertake, and describe when you plan to do what for the duration of the project.
Foundational skills and knowledge: state the knowledge and skills you already have that will help you do this project on your own. List at least 2 tutorials you found that will help you get started.
i have a strong background in 3D-Design and game development in Unity. So i can really concentrate on the design of gestures and usability.
Learning goals: which new skills do you need to learn to make this project successful? What kind of person might be a useful sparring partner in that?
Gesture design is really new to me.
usability testings are playing a really big role to get "universal" gestures, that everyone understands.
Support: what kind of support will you need? Is that support available?
Materials: which materials do you expect to use? Where will you get them? What's the cost? Are they the most sustainable option available?
mostly MDF, i havn't researched which plastic i am going to use for the cone.


Phase 1 - Prototyping in Unity
Today i started with the development of the Render Pipeline for the Hologram.
Basically the Pipeline consists of 4 different cameras that are around the object of interest.
Each Camera is rendering it's own side of the object.
Object of interest
front camera
back camera
left camera
right camera
all cameras at once
the view frustum of each camera is rendered to a render texture in unity.
this texture gets applied to a shader - that i use as a material for a plane.
To get a nice Rendered image of this setup. i am using a orthographic camera that looks down from above.
final render output
R
E
N
D
E
R
P
I
P
E
L
I
N
E
L
E
A
P
M
O
T
I
O
N
S
E
T
U
P
Phase 2 - Prototyping in Unity
The second day I spent writing a very performant spawner for objects. I tried to keep it as modular as possible so that I could exchange objects as easily and quickly as possible during the development of the hologram.
During the programming work on this framework I noticed that my actual focus which I set myself - namely the Gesture Design - moved a little into the background. As I am currently thinking more about the visual part of the object, more and more interesting aspects come to my mind that I would like to pursue.
on the one hand the idea came to me that one could fly differently animated human bodies, in most different poses by the space.
The interaction with it would then consist of grabbing one of these flying bodies with your hands and scaling it up to observe it.
If I abstract this concept even further - flying objects that can be seen larger. What could that be to make it fit more into the critical part of the minor?
I thought it would be very easy to put the Leap Motion into operation. BUT it was a longer process than I thought.
I looked on the LeapMotion website for a suitable driver. On the site you can find the SDK and the drivers for the device very easy and well documented. The Unity Packages which are included in the driver download are all "first time" made for VR glasses.
This means that the LeapMotion is attached to the front of a pair of VR glasses and looks at the wearer's hands from there. But for my purposes I need the desktop version, so the device stands on the table and still looks up. My hands are then placed above it.
Unfortunately the documentation of LeapMotion didn't contain that much about this, because the efforts of the company seem to be more in the direction of virtual reality.
So I just downloaded all the Unity modules that were available and tried them out individually to see if they were available for my purposes.
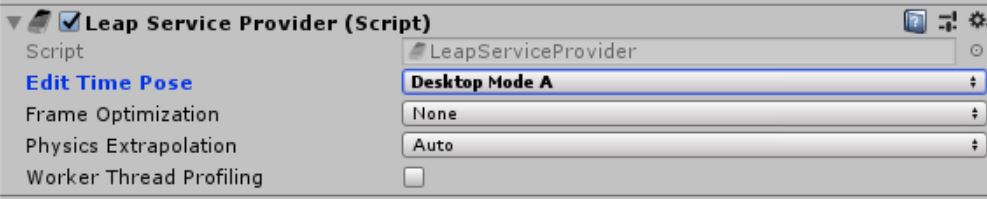
In the end, it was actually just one setting I had to change. Namely the Edit Time Pose entry.
since everything is working now I have played around a lot with the acuracy of the tracking, but as you can see in the GIF, there is a big problem recognizing the middle finger as a single finger! (haha of course the middle finger)
More tasks to fine-tune tracking:
--> find correct scaling of the hands in comparison to the room
--> use other hand models
The GameManager controls the spawning of all objects. To keep the whole thing modular, I used a Scriptable Object as ObjectPool. The advantage of these objects is that you can create different sets.
All with different objects, different materials, different colors, different rotation and movement speeds.
This system allows me to change the contents of the spawner quickly and efficiently.
I plan to do some testing with fellow students next week to find out what they would like to see in a hologram, for example.
Game Manager with adjustment settings
Scriptable object for object pooling
This is how the object spawner looks like
first interaction with the spawned objects
In order to make my system compatible with the Leap Motion, I first decided on a very simple physical interaction. Every spawned object gets a rigidbody, a component that gives the object physical properties. I switched off gravity for each object so that the objects could fly around.
--> Is it also interesting to play with gravitational changes as an interaction concept? idk
The hands have been given a collider so that the objects can be knocked away with them.
For the first tests the setup was very good.
--> My first lessons are that without spatial structures it is very difficult to locate one's own hand in virtual space. Maybe light lines can give a feeling for the position in the room.
More interactions to implement:
--> grasping an object
--> change the scaling of an object with pinching. (pinch thumb and index finger on both hands and pull apart to enlarge or reduce)
P
R
O
G
R
A
M
M
I
N
G
F
I
R
S
T
I
N
T
E
R
A
C
T
I
O
N
Phase 3 - the casing
S
K
E
T
C
H
I
N
G
P
A
P
E
R
P
R
O
T
O
T
Y
P
E
B
U
I
L
D
I
N
G
T
H
E
C
A
S
I
N
G
https://www.gamma.nl/assortiment/martens-acrylplaat-transparant-50x100-cm/p/B151770
Phase 4 - the plastic cone
F
I
R
S
T
T
R
Y
In order to get a better idea for the hologram case, I built a paper prototype after the first draft sketches.
It helps me to make a small paper prototype to get a feeling for the case. I wasn't sure how to connect all the sides. And whether you should be able to look into the box from different sides or not.
To hold the different single pages in my hand helped me to think about a connection of the single elements.
Due to the size of my monitor, the size of the box has to be adjusted accordingly.
I chose MDF as the construction material because it is cheap and stable enough for a prototype version of the cabinet.
Unfortunately, MDF always has black edges after laser cutting that rub off. Therefore I got paper towels from the back room of the Makers Lab and cleaned all edges of black carbon residues together with some water.
In order to be able to cut the case as accurately as possible with a finger joint system, I used the following website:
https://www.makercase.com/
I got the tip for the page from Kat and Anna. They both had to produce a lot of boxes for their research project and were therefore my go to persons when I had questions about this topic.
They explained to me that with the MDF from Gamma and the precision of our lasercutters in the LAB, a KERF value of 0.15 was the best, so that the fingers would mesh neatly at the edges and be very firmly connected to each other.
Merci again to both of you for the support!
Thereupon I downloaded my files about this tool and adapted everything to my wishes for cutting.
When all parts were finished and clean, I started to put everything into each other. and unfortunately I have to find out that all fingers are "relatively" loosely in each other (ohhhh damn).
After a little research I noticed that in the online tool I forgot to check the box for the Kerf value, which is why I entered the correct value of 0.15, but didn't apply it.
So how do I fix the problem ? HOT GLUE YOUR PROBLEMS AWAY. was the motto in any case. I took a hot glue gun from the LAB and applied it to the inner edges of the case.
C
U
T
T
I
N
G
Phase 5 - polishing in unity
N
E
W
H
A
N
D
M
O
D
E
L
S
The wooden box has the exact dimensions of the monitor, so I could simply place it on top of the box. So now I could put everything together for the first time. So monitor plus box plus plastic cone, I unfortunately had to find out that I made a mistake in the calculation for the height of the plastic cone.
Unfortunately it was much too low. I also noticed that due to the shape of the cone the hologram was very small.
At the beginning I actually decided for the cone, so that you can see the hologram from all sides.
Since it must be very dark, I built the box with only one opening, which made the shape of the cone obsolete.
To change the size of the hologram and reach the maximum size, I simply cut a new pane out of the remains of the plexiglass plate, which corresponded approximately to the width of the monitor.
F
U
R
T
H
E
R
T
E
S
T
I
N
G
After I finished cutting the four equal parts with the lasercutter, I used black Washi Tape to connect the parts together.
The tape worked very well because it is very flexible and I was able to fold the cone together again.
After I finished cutting the four equal parts with the lasercutter, I used black Washi Tape to connect the parts together.
The tape worked very well because it is very flexible and I was able to fold the cone together again.
F
I
N
A
L
O
B
J
E
C
T
S
G
A
M
E
L
O
O
P
It was especially important to me to achieve a certain creepy factor with this installation object.
So that my hands are as alienated from my own hands as possible, I chose these claws, which remind me more of knives than fingers.
I personally love the aesthetics of the 90s when it comes to computer graphics.
Flat surfaces with a certain kind of gloss. Of course, everything had to be in moritz pink.
To have different objects I created two different masks that you can grasp with your hands. The last variant is a ball that you can play with. Andy, for example, found out that you can throw the ball from one hand to the other.
The GameLoop makes it possible to grab the various objects and rotate and move them in virtual space. If you throw an object away, it appears again in the middle of the digital space as soon as the object has travelled a certain distance.